Jika mengalami hal seperti judul di atas, (mungkin) bisa ditangani dengan cara :
- Cari file SMTP.BOX atau sejenisnya di folder Lotus Notes (biasanya di Program Files)
- Rename File tersebut, contoh : SMTP.BXX
Semoga bisa membantu .....

Minggu, 17 November 2013
Kamis, 17 Oktober 2013
Mengembalikan urutan Drive di Kotak Dialog saat Buka File atau Simpan File (Windows XP)
Jika suatu saat urutan drive saat proses kotak dialog "Open File(s)' and 'Save As" terlihat kacau (tidak urut berdasarkan nama), ini ada TIPS untuk memperbaiki urutan tersebut :
- Lakukan proses Save As atau Buka File
- Klik Kanan pada bagian kosong dan pilih select 'Arrange Icons By' > Name / Size / Type /
Modified.... pilih Name
- Tekan dan tahan Tombol Ctrl saat menutup Dialog Box
- Urutan Drive akan kembali normal (Urut berdasar Nama)
SEMOGA MEMBANTU !!!

- Lakukan proses Save As atau Buka File
- Klik Kanan pada bagian kosong dan pilih select 'Arrange Icons By' > Name / Size / Type /
Modified.... pilih Name
- Tekan dan tahan Tombol Ctrl saat menutup Dialog Box
- Urutan Drive akan kembali normal (Urut berdasar Nama)
SEMOGA MEMBANTU !!!
Kamis, 26 September 2013
Cara Mengatasi Kode-kode Error Printer Canon Pixma MP258
Kode Error Canon MP258 dan Cara Mengatasinya :
Kode Error MP258 ada 2 jenis kode, yaitu :
1. yg menggunakan huruf depan P, misal P07
2. yg menggunakan huruf depan E, misal E05
Kode Error P Canon MP258 :
P02 (Carriage error)
Solusi :
1. Pastikan tidak ada benda asing yg nyangkut di roll printer.
2. Bersihkan dan cek encodernya, mungkin kena cipratan tinta.
P03 (Line feed error)
Penyebab : Timing Disk kotor / rusak.
Solusi :
1. Cek timing disk sensor di sebelah kiri printer
2. Cek dan bersihkan boardnya.
P05 (ASF sensor error)
Penyebab : sensor pendeteksi kertas Canon MP258 Error.
Solusi :
Coba ganti salah satu spare part berikut ini :
• ASF / PE sensor unit.
• Motor .
• Board Printer Canon MP258.
P06 (Internal temperature error):
Penyebab : panas yg berlebihan di dalam printer Canon MP258.
Solusi :
1. Bersihkan bagian dalam printer MP258.
2. ganti Board Printer MP258
P07 (Ink absorber full):
Penyebab : Ink Counter Full / Penuh, Printer Canon MP258 minta di reset pakai Software.
Solusi : Reset Printer Canon MP258 dengan menggunakan software
P08 (Print head temperature rise error):
Penyebab : Head terlalu panas, melebihi ambang batas, biasanya Catridge warnanya
Ini yang pernah saya alami ,Tanpa diketahui penyebabnya tiba2 printer saya dengan seri di atas mengalami error sehingga tidak bisa ngeprint dan scan, sudah ditekan tombol stop/reset pun tetap tidak berfungsi. Setelah search sana-sini akhirnya saya dapatkan juga solusi memperbaiki error itu. Jika anda mempunyai masalah yang sama seperti yang pernah saya hadapi, coba ikuti langkah-langkah di bawah ini. Caranya:
1. Matikan printer dengan menekan tombol power.
2. Tekan tombol stop/reset dan jangan di lepas, secara bersamaan tekan tombol power.
3. Lepas tombol reset sebentar lalu tekan lagi tombol reset sebanyak dua kali (tombol power masih di tekan).
4. Lepaskan tombol power.
5. Tunggu sampai keluar angka 0 lalu matikan printer dengan menekan tombol power.
6. Tekan dan tahan tombol reset, secara bersamaan tekan tombol power.
7. Lepaskan tombol reset sebentar lalu tekan lagi tombol reset sebanyak empat kali (tombol power masih ditekan).
8. Lepaskan tombol power.
9. Tunggu sampai keluar angka 1 lalu matikan printer dengan menekan tombol power dan cabut kabel listriknya.
8. Tunggu sekitar satu menit kemudian nyalakan kembali printer nya.
Mudah-mudahan printer anda dapat berfungsi kembali seperti biasanya.
Kalau Tetep tidak bisa
Coba ganti catrid warna Printer Canon MP258.
P09 (EEPROM error)
Penyebab : EEPROM board Canon MP258 mengalami Corrupt atau rusak.
Solusi :
1. ganti Board Printer Canon MP258.
P15 (USB VBUS over current)
Penyebab : Printer kelebihan arus dari kabel USB Printer Canon MP258.
Solusi :
1. Coba Ganti Kabel USB Printer Canon MP258.
2. Jika masih rusak, ganti Board Printer Canon MP258.
P20 (Other hardware error)
Penyebab : kerusakan hardware lainnya
Solusi :
ganti Board Printer Canon MP258.
P22 (Scanner error)
Penyebab : scanner tidak berfungsi
Solusi :
1. Ganti scanner Printer Canon MP258.
2. Ganti Board Printer Canon MP258.
Kode Error E canon MP258 :
E04 : Catridge canon MP258 tidak terpasang dengan baik.
Solusi : Ambil catridge, trus pasang lagi
E05 : Catridge canon MP258 tidak terpasang dengan baik atau salah satu catrid ada yg rusak
Solusi :
1. Ambil catridge, trus pasang lagi
2. Ganti catridge jika ada yg rusak
E14 dan E15 : Catridge canon MP258 tidak terpasang dengan baik.
Solusi : Ambil catridge, trus pasang lagi
E13 dan E16: Ink has run out / catridge minta di reset.
Solusi :
Tekan tombol STOP / Reset selama 5 - 15 detik tunggu sampai led display berproses.
Semoga Berhaasil...
Sumber :
http://yascus.blogspot.com/2011/07/cara-mengatasi-kode-kode-error-p08.html
Sabtu, 21 September 2013
Cara Mengubah IP Address lewat Command Prompt
Saya udah lupa dapet tips mengubah IP Address melalui command prompt
ini darimana, soalnya udah lama banget. Nah daripada saya ntar lupa
juga mending di posting aja disini. Hehe, maaf kalo lagi-lagi repost..
v(^_^)
Kebetulan dikantor ada banyak komputer yang harus saya urus dan semuanya terkoneksi di dalam jaringan lokal (LAN) yang IP Address nya disetting secara manual. Kalo setting satu per satu ribet dan cape juga mesti klak klik menunya.
Nah dengan perintah netsh di command prompt maka kerjaan setting ip address di banyak komputer jadi lebih cepat.

Ok, misalnya saya ingin mengubah sebuah komputer agar ip nya menjadi 192.168.0.2, subnet 255.255.255.0 dan gateway 192.168.0.1
maka perintah yang digunakan di command prompt adalah ;
lalu untuk DNS nya, misalkan menggunakan DNS Google 8.8.8.8
maka perintah yang digunakan di command prompt adalah ;
Keterangan :
- netsh interface ip set address = perintah untuk meng-update ip
- netsh interface ip set dns = perintah untuk mengupdate dns
- Local Area Connection = nama interface yang mau kita ubah
(biasanya jika kita mempunyai 2 lan interface, secara default maka namanya ; Local Area Connection dan Local Area Connection 2, dst)
- static = address type
- 192.168.0.2 = IP Address yg ingin kita set
- 255.255.255.0 = subnet mask
- 192.168.0.1 = Default Gateway
Saya rasa cukup mudah dipahamikan?? (^_^)
Selanjutnya, bagaimana jika sebaliknya, yakni kita ingin mengubah ip statis menjadi dinamis atau biasa di sebut DHCP??
Berikut perintahnya ;
lalu untuk DNS nya ;
Nah gampang kan??? (^_^)
Tapi kalo yang disetting banyak gimana?
Nah kalo itu semuanya harus di persiapkan lebih dulu supaya eksekusi di pc bersangkutan lebih mudah. Caranya (sekalian ilustrasi biar gampang) ;
Misalkan ada 3 buah komputer yaitu PC-A, PC-B dan PC-C
PC-A mau di beri ip 192.168.0.2
PC-B mau di beri ip 192.168.0.3
PC-C mau di beri ip 192.168.0.4
dan semuanya harus menggunakan ip gateway dari modem, misalnya 192.168.0.1
Yang harus kita lakukan adalah mengetik perintah netsh di atas di notepad kemudian simpan dengan ekstensi *.bat. Biar lebih gampang sesuaikan aja dengan nama pc nya.
Contoh ;
Dan seterusnya.. Selanjutnya tinggal copy ke PC yang bersangkutan dan jalankan..
Sekian semoga bermanfaat.. (^_^)b
sumber :
http://dracidia.blogspot.com/2011/06/cara-ubah-ip-address-melalui-command.html
Kebetulan dikantor ada banyak komputer yang harus saya urus dan semuanya terkoneksi di dalam jaringan lokal (LAN) yang IP Address nya disetting secara manual. Kalo setting satu per satu ribet dan cape juga mesti klak klik menunya.
Nah dengan perintah netsh di command prompt maka kerjaan setting ip address di banyak komputer jadi lebih cepat.
Ok, misalnya saya ingin mengubah sebuah komputer agar ip nya menjadi 192.168.0.2, subnet 255.255.255.0 dan gateway 192.168.0.1
maka perintah yang digunakan di command prompt adalah ;
netsh interface ip set address "Local Area Connection" static 192.168.0.2 255.255.255.0 192.168.0.1
lalu untuk DNS nya, misalkan menggunakan DNS Google 8.8.8.8
maka perintah yang digunakan di command prompt adalah ;
netsh interface ip set dns "Local Area Connection" source=static addr=8.8.8.8
Keterangan :
- netsh interface ip set address = perintah untuk meng-update ip
- netsh interface ip set dns = perintah untuk mengupdate dns
- Local Area Connection = nama interface yang mau kita ubah
(biasanya jika kita mempunyai 2 lan interface, secara default maka namanya ; Local Area Connection dan Local Area Connection 2, dst)
- static = address type
- 192.168.0.2 = IP Address yg ingin kita set
- 255.255.255.0 = subnet mask
- 192.168.0.1 = Default Gateway
Saya rasa cukup mudah dipahamikan?? (^_^)
Selanjutnya, bagaimana jika sebaliknya, yakni kita ingin mengubah ip statis menjadi dinamis atau biasa di sebut DHCP??
Berikut perintahnya ;
netsh interface ip set address "Local Area Connection" dhcp
lalu untuk DNS nya ;
netsh interface ip set dns "Local Area Connection" dhcp
Nah gampang kan??? (^_^)
Tapi kalo yang disetting banyak gimana?
Nah kalo itu semuanya harus di persiapkan lebih dulu supaya eksekusi di pc bersangkutan lebih mudah. Caranya (sekalian ilustrasi biar gampang) ;
Misalkan ada 3 buah komputer yaitu PC-A, PC-B dan PC-C
PC-A mau di beri ip 192.168.0.2
PC-B mau di beri ip 192.168.0.3
PC-C mau di beri ip 192.168.0.4
dan semuanya harus menggunakan ip gateway dari modem, misalnya 192.168.0.1
Yang harus kita lakukan adalah mengetik perintah netsh di atas di notepad kemudian simpan dengan ekstensi *.bat. Biar lebih gampang sesuaikan aja dengan nama pc nya.
Contoh ;
netsh interface ip set address "Local Area Connection" static 192.168.0.2 255.255.255.0 192.168.0.1Simpan dengan nama PC-A.bat
netsh interface ip set address "Local Area Connection" static 192.168.0.3 255.255.255.0 192.168.0.1Simpan dengan nama PC-B.bat
Dan seterusnya.. Selanjutnya tinggal copy ke PC yang bersangkutan dan jalankan..
Sekian semoga bermanfaat.. (^_^)b
sumber :
http://dracidia.blogspot.com/2011/06/cara-ubah-ip-address-melalui-command.html
Kamis, 13 Juni 2013
Mengatasi Masalah " ..... is not accessible. You might not have permission to use this network resource ..."
Terkadang kita dihadapkan dengan masalah tidak bisa membuka folder / drive yang kita Sharing dalam lingkupan jaringan lokal.
Khususnya untuk warning :
" ..... is not accessible. You might not have permission to use this network resource ..."
Ini ada beberapa langkah , mungkin bisa membantu :
1. Dari Control Panel pilih Administrative Tools> Computer Management> Storage> Disk Management
2. Klik kanan pada drive tersebut
3. Pilih Properties dan klik tab Security
4. Klik Everyone User Group dan hilangkan centang pd 'Permissions for Administrators'
5. Klik pada Allow> Full Control box dan kemudian tombol Apply di bagian bawah.
6. Anda dapat memeriksa pengguna lain dan kelompok dalam jendela ini dan memungkinkan mereka menggunakan juga.
7. Klik OK dan keluar dari Security Tab.
8. Sekarang Anda harus diizinkan akses ke drive melalui Sharing pada jaringan Workgroup
Rabu, 05 Juni 2013
Tips menjadikan IDM Full Version Tanpa Patching
1. Download IDM versi terbaru di situs resminya.
2. Matikan koneksi Internet.
3. Install IDM. Apabila diminta reboot, lakukan.
4. Setelah reboot, buka IDM dan pilih Registration. Catatan, Koneksi internet harus dalam keadaan mati.
5. Masukkan Nama Depan, Nama Belakang dan Email secara acak. Fake juga boleh. Kemudian masukkan Serial Number berikut ini (pilih salah satu):
GZLJY-X50S3-0S20D-NFRF9
W3J5U-8U66N-D0B9M-54SLM
EC0Q6-QN7UH-5S3JB-YZMEK
Atau bisa juga menggunakan Serial Number yang didapat dari keygen BRD di sini
6. IDM akan memberi tahu bahwa Serial number yang kita gunakan invalid atau fake dan akan tertutup secara otomatis, abaikan.
7. Kalau tidak tertutup secara otomatis, tutup IDM dari taskmanager.

8. Langkah berikutnya, Buka file HOST di C:\WINDOWS\system32\drivers\etc dengan
NOTEPAD. Klik Show Hidden Files and Folders kalau file tersebut ke-hidden.
9. Di barisan paling bawah ada tulisan : 127.0.0.1 localhost
10. Copy Paste tulisan berikut dibawah 127.0.0.1 localhost, kemudian Save.
11. Buka IDM dan sambungkan ke internet. Silahkan cek Versi IDM. Apabila ada revisi baru, silahkan langsung update..
2. Matikan koneksi Internet.
3. Install IDM. Apabila diminta reboot, lakukan.
4. Setelah reboot, buka IDM dan pilih Registration. Catatan, Koneksi internet harus dalam keadaan mati.
5. Masukkan Nama Depan, Nama Belakang dan Email secara acak. Fake juga boleh. Kemudian masukkan Serial Number berikut ini (pilih salah satu):
GZLJY-X50S3-0S20D-NFRF9
W3J5U-8U66N-D0B9M-54SLM
EC0Q6-QN7UH-5S3JB-YZMEK
Atau bisa juga menggunakan Serial Number yang didapat dari keygen BRD di sini
6. IDM akan memberi tahu bahwa Serial number yang kita gunakan invalid atau fake dan akan tertutup secara otomatis, abaikan.
7. Kalau tidak tertutup secara otomatis, tutup IDM dari taskmanager.
8. Langkah berikutnya, Buka file HOST di C:\WINDOWS\system32\drivers\etc dengan
NOTEPAD. Klik Show Hidden Files and Folders kalau file tersebut ke-hidden.
9. Di barisan paling bawah ada tulisan : 127.0.0.1 localhost
10. Copy Paste tulisan berikut dibawah 127.0.0.1 localhost, kemudian Save.
127.0.0.1 tonec.com
127.0.0.1 www.tonec.com
127.0.0.1 registeridm.com
127.0.0.1 www.registeridm.com
127.0.0.1 secure.registeridm.com
127.0.0.1 secure.internetdownloadmanager.com
127.0.0.1 mirror.internetdownloadmanager.com
127.0.0.1 mirror2.internetdownloadmanager.com
127.0.0.1 www.tonec.com
127.0.0.1 registeridm.com
127.0.0.1 www.registeridm.com
127.0.0.1 secure.registeridm.com
127.0.0.1 secure.internetdownloadmanager.com
127.0.0.1 mirror.internetdownloadmanager.com
127.0.0.1 mirror2.internetdownloadmanager.com
Sedikit nambahin. Untuk
update IDM beberapa versi belakangan ini, rupanya pihak IDM berusaha
meng-counter cara ini dengan memasukkan tanda pagar pada catatan di file
host setiap update IDM terbaru. Klo dah pake trik ini trus masih
kedetect fake, coba liat file hostnya, pasti berubah seperti ini;
127.0.0.1 tonec.com
127.0.0.1 www.tonec.com
#27.0.0.1 registeridm.com
#27.0.0.1 www.registeridm.com
#27.0.0.1 secure.registeridm.com
#27.0.0.1 secure.internetdownloadmanager.com
#27.0.0.1 mirror.internetdownloadmanager.com
#27.0.0.1 mirror2.internetdownloadmanager.com
Supaya ga kedetect fake setelah update selesai, tanda pagar di atas langsung diubah aja menjadi 1 seperti sedia kala.
127.0.0.1 tonec.com
127.0.0.1 www.tonec.com
127.0.0.1 registeridm.com
127.0.0.1 www.registeridm.com
127.0.0.1 secure.registeridm.com
127.0.0.1 secure.internetdownloadmanager.com
127.0.0.1 mirror.internetdownloadmanager.com
127.0.0.1 mirror2.internetdownloadmanager.com
127.0.0.1 tonec.com
127.0.0.1 www.tonec.com
#27.0.0.1 registeridm.com
#27.0.0.1 www.registeridm.com
#27.0.0.1 secure.registeridm.com
#27.0.0.1 secure.internetdownloadmanager.com
#27.0.0.1 mirror.internetdownloadmanager.com
#27.0.0.1 mirror2.internetdownloadmanager.com
Supaya ga kedetect fake setelah update selesai, tanda pagar di atas langsung diubah aja menjadi 1 seperti sedia kala.
127.0.0.1 tonec.com
127.0.0.1 www.tonec.com
127.0.0.1 registeridm.com
127.0.0.1 www.registeridm.com
127.0.0.1 secure.registeridm.com
127.0.0.1 secure.internetdownloadmanager.com
127.0.0.1 mirror.internetdownloadmanager.com
127.0.0.1 mirror2.internetdownloadmanager.com
Memaksimal-kan koneksi internet dengan Setting DNS
Mencari DNS yang bagus/baik buat Koneksi
internet lemot ? mungkin karna paket internet *standar*. ada juga yang mungkin koneksi internet kamu blm maksimal nah gmana cara biar bisa maksimal koneksi internet tersebut. banyak DNS2 public seperti google DNS dan lain2.nah sekali ini tidak salahnya kita cari DNS yang baik untuk internet kita.
Caranya adalah
1. Download namebench-1.3.1-Windows
2. buka program tersebut..
3. setting menjadi seperti ini

4. kemudian klik start benchmark
5. biarkan namebench bekerja mencari DNS yang terbaik untuk koneksi internet kita. sampai selesai..
6. dan hasilnya akan seperti ini
klik di sini utk perbesar gambar di bawah ini

7. Gunakan Ip yang ada Di primary server dan secondary server di DNS kamu..
SUMBER
Selasa, 14 Mei 2013
Minggu, 28 April 2013
QTranslate 5.0.0.0 Full (FREEWARE)

QTranslate 5.0.0 Full.
Dari namanya saja sudah bisa ditebak fungsinya buat apa. Ya, ini
software untuk menerjemahkan berbagai macam bahasa, sama seperti Ace Translator, yang membedakan diantara keduanya kalau QTranslate 5.0.0 merupakan software gratis, sedangkan Ace Translator
software berbayar. Gratis bukan berarti kalah dengan yang berbayar, dan
size software ini begitu kecil, tidak sampai 500 kb, sedangkan Ace Translator sampai 1 mb. QTranslate 5.0.0
mendukung menejermahkan bahasa dari berbagai sumber seperti Google
Translate, Microsoft Translator, Promt, Babylon, SDL, Yandex, dan
Youdao. Yang lebih mengesankan lagi, software ini mempunyai dua pilihan
saat instalasi, yaitu versi instal atau terpasang di pc dan versi
portable atau perlu menginstal tapi bisa dijalankan. Sangat hebat
bukan?, padahal software kecil namun manfaatnya besar.
Sumber :
http://www.xyraclius.com
Selasa, 16 April 2013
Mengembalikan Tombol Start dan Menu pada Windows 8
Despite Microsoft’s best efforts to ensure that the Start button and menu remain banished from Windows 8, a bunch of third-party replacements have emerged. Really, it just goes to show how devoted the Desktop Windows userbase is: Microsoft completely stripped out the underlying Start menu code to quash potential Luddite revolutionaries, and yet months after the release of Windows 8 there are dozens of Start menu and Start button replacements — some of which are far superior to Microsoft’s own Windows 7 STart menu.
Let’s take a look at the best, cheapest, and most authentic apps for bringing back the Windows Start menu and button.

StartIsBack
If you want a Start menu replacement that looks exactly like Windows 7, StartIsBack is for you. You get the same Start menu orb icon, the same search box, the same jump lists, and — for better or worse — even the same Aero transparency! As you can see in the screenshot above, StartIsBack even detects if your system needs to restart to apply some patches; it really is just like the Windows 7 Start menu.Where StartIsBack diverges from the Windows 7 Start menu, though, is configurability: StartIsBack is fully customizable, and includes a handful of useful Windows 8-specific features, too. You can configure which hot corners are enabled, make your PC jump straight to the Desktop when it first boots up, and configure a key combo to show the Windows 8 Start screen (Win+Ctrl by default). If Start menu and taskbar transparency aren’t your thing, StartIsBack lets you disable it — and you can change the Start button orb icon, too.
Download StartIsBack ($3, free 30-day trial)

Pokki
Where StartIsBack tries to replicate the Windows of yesteryear, Pokki (free) is very much its own beast — and as much as I love the Windows 7 Start menu, I have to admit that Pokki is probably even better. It utilizes a neat “pinning” system that isn’t unlike the home screen of your smartphone or tablet (though I would argue that the Windows taskbar/superbar still does a better job). You can also add widgets to Pokki, such as Gmail or Facebook, which display your latest email or status updates.By default, Pokki will configure your Windows 8 system to boot straight to the Desktop — and there is an option that will just completely disable the hot corners, if you so desire. (Remember, Win+C pops open the Charms menu, if you need.)
Download Pokki (free)

StartMenu8
If you want the Windows 7 Start menu look-and-feel, but you’re not prepared to fork out a few dollars for StartIsBack or Start8, StartMenu8 is a solid alternative. While the interface won’t win any prizes — it feels a lot like the early Linux apps that ruthlessly ripped off Windows — you get a fair amount of configurability, and a handful of Windows 8-specific toggles that are very useful.By default, StartMenu8 will skip the Windows 8 Start screen and go straight to the Desktop, and disable Windows 8′s hot corners. There’s also the option to disable the sidebar, if you really don’t ever want to see Windows 8 ever again. The StartMenu8 button icon can be altered, and you can add and remove which links appear up the right side of the Start menu. Overall, StartMenu8 looks and feels a bit clunky — and, incidentally, watch out for some delicious bundleware during the installation process.
Download StartMenu8 (free)
Source :
http://www.extremetech.com
Cara Jitu Meningkatkan Sinyal Modem Smartfren
1. Siapkan kaleng Pocari Sweat atau Coca Cola atau apa saja, yang penting kaleng tersebut tidak terlalu kecil seperti kaleng Milo yang agak slim dan langsing, pasti tahu kan kaleng Milo?.
2. Siapkan CD, yang tidak terpakai saja atau yang sudah rusak, kalau yang masih sering dipakai, nanti saat dipakai untuk memperkuat atau meningkatkan sinyal modem, salah satu anggota keluarga Anda ingin memakainya, jadi Anda bisa kena omelan, bukan tanggung jawab Saya yah, kalau Anda kena omelan.
3. Jika kaleng dan CD sudah disiapkan, colok modem, kemudian letakkan CD dibawah modem Smartfren, dan kaleng di samping modem Smartfren, dan juga kaleng menindih CD. Belum tahu maksud Saya?, seperti gambar di bawah ini contohnya.
 |
| Dua lembar kertas yang biru, boleh juga tuh |
Ok dari itu semua Anda bisa mendapatkan sinyal Evdo Smartfren 4 sampai 5 bar, jika sudah dapat 4 bar, itu sudah cukup bagi langganan unlimited yang kecepatannya 384 KBPS, jika Anda mendapatkan 3 bar Evdo smartfen, Anda restart PC, lalu cepat-cepat menggeser atau memutar sedikit kaleng dan CD saat mematikan PC. Jika masih terus dapat 3 bar Evdo, lakukan hal tersebut berulang-ulang, haha, sering banget nih Saya, kalau dapat hanya 3 bar sinyal Evdo.
Dan hasilnya seperti gambar dibawah ini

Demikian Cara Jitu Meningkatkan Sinyal Modem Smartfren, mudah-mudahan bisa bekerja pada modem dan tempat tinggal Anda. Jika tidak berhasil, maafkan Saya ya.
Source :
http://www.xyraclius.com
Windows Loader 2.2.1 By Daz Full Activator


Hal-hal yang Anda mungkin ingin tahu:
- It works on 32-bit and 64-bit systems
- It's compatible with Windows 7 SP1 and all system updates
- It's compatible with all system languages
- It can be used to pre-activate Windows
- It allows you to install custom OEM information
- It features application integrity checking
- It supports hidden partitions and some complex setups
- It can work alongside Linux's GRUB or any other boot manager
- It works with VMware, VirtualBox and Hyper-V
- It works with most hard drive encryption software e.g. TrueCrypt or BitLocker
- It allows you to add your own certificates and serials externally
- It will install just the certificate and serial for users with an existing SLIC 2.1
- It features automated system profiling (The application matches everything up for you)
- It won't modify any system files
- It runs before Windows is launched
- No extra processes are run so you have nothing eating at your RAM
- All key parts of the loader are encrypted with a custom encryption
- Every user has a unique version of the loader installed on his or her system
Supported operating systems:
- Windows 7 Ultimate
- Windows 7 Ultimate E
- Windows 7 Professional
- Windows 7 Professional E
- Windows 7 Home Premium
- Windows 7 Home Premium E
- Windows 7 Home Basic
- Windows 7 Starter
- Windows 7 Starter E
- Windows Vista Ultimate
- Windows Vista Business
- Windows Vista Business N
- Windows Vista Home Premium
- Windows Vista Home Basic
- Windows Vista Home Basic N
- Windows Vista Starter
- Windows Server 2008 Enterprise
- Windows Server 2008 Enterprise (Without Hyper-V)
- Windows Server 2008 Foundation
- Windows Server 2008 Standard
- Windows Small Business Server 2008
- Windows Storage Server 2008 Standard
- Windows Storage Server 2008 R2 Essentials
- Windows Server 2008 R2 Enterprise
- Windows Server 2008 R2 Foundation
- Windows Server 2008 R2 Standard
- Windows Server 2008 R2 Datacenter
- Windows Small Business Server 2011 Standard
- Windows Small Business Server 2011 Essentials
- Windows Home Server 2011
- Windows Server 2012 Standard
- Windows Server 2012 Essentials
- Windows Server 2012 Foundation
- Windows Server 2012 Datacenter
- Windows Storage Server 2012 Standard
- Windows Storage Server 2012 Workgroup
- Windows MultiPoint Server 2012 Standard
- Windows MultiPoint Server 2012 Premium
Download:
RAR Password: www.xyraclius.comSource :
http://www.xyraclius.com/
Cara Yang Ampuh Mempercepat Upload File
Cara Yang Ampuh Mempercepat Upload File. Banyak downloader, tentu juga banyak uploader. Tanpa uploader, pasti tidak ada downloader. Sering kali kita download file di berbagai file hosting, dengan software IDM, proses download jadi lebih cepat dari sebelumnya, bahkan hingga 5 kali lipat. Nah, kalau IDM dapat mempercepat download, sedangkan software ini untuk mempercepat upload. Namanya yaitu File & Image Uploader. Dengan software ini, proses upload jadi lebih cepat dibandingkan anda mengupload file di file hosting tersebut, bagaimana cara menggunakannya?, berikut tutorialnya:
1. Download File & Images Uploader
2. Setelah selesai download, buka software. Software ini portable, jadi tidak perlu diinstal
3. Pada top menu, klik tools > setting > connection. Pada tab menu HTTP, buffer size pilih 1024 kb


4. Pada menu file hoster, tambahkan akun file hosting anda, masukkan sesuai login file hosting, misalkan login dengan username, ya gunakan username, misalkan login dengan email, ya gunakan dengan email, contohnya seperti gambar dibawah ini

5. Selesai Konfigurasi, kemudian mulai upload file yang anda inginkan. Pilih file hosting yang sudah ditambahkan, dan disamping file hosting, ada kotak berwarna hijau, berarti bisa digunakan, bila putih, tidak bisa digunakan. Setelah itu semua selesai Klik gambar centang untuk memulai upload. Contohnya seperti gambar dibawah ini. Dari gambar dibawah tersebut, ada Rar Password, Description, Multiselect, Split files bigger than, dan masih banyak lagi, tentu anda sudah tahu kan fungsi-fungsinya buat apa aja?


7. Selesai Upload. Inilah buktinya

Nanti otomatis mempunyai deskripsi file dari File & Image Uploader yaitu uploaded with File Uploader (z-o-o-m.eu).
Memang ada untuk registrasi supaya menjadi registered version, tapi versi freeware dengan registered sama saja, tidak ada bedanya, saya sendiri sudah mencobanya, dan jika sudah menjadi registered version, kemudian ganti bahasa maupun muncul pemberitahuan update, maka akan kembali lagi ke freeware version.
Mungkin hanya itu saja, semoga bisa mempercepat upload file anda, tapi ingat, itu semua kembali pada koneksi internet anda. software ini hanya meningkatkan sesuai kecepatan dan bandwidth koneksi internet anda, sama seperti IDM.
Sumber : http://www.xyraclius.com
Solusi Dan Cara Cepat Install Driver Laptop-PC dengan Driverpack 12.3

"INFO : DRIVERPACK VERSI 13 2013 sudah RELEASE, Silahkan dibaca dan download di http://adf.ly/N25Ve"
Sebenarnya cara kerja Driverpack Solution 12.3 hampir sama dengan
software Driver Pack pada umumnya (CD/DVD driver bawaan), sekali klik –
diaktifkan, Driverpack Solution 12.3
akan langsung mendeteksi dahulu Informasi Umum yang ada di komputer
kita (baik Hardware maupun Software), terutama deteksi perangkat sudah
memiliki driver apa belum. Kalau sistem di PC kita belum ada driver-nya (
di device manager bertanda seru-tanda tanya ) Driverpack Solution 12.3 langsung memberitahu dan menawarkan ketersediaan driver yang dia miliki (di database Folder-Direktori-nya > terserah dalam USB Flashdisk atau DVD).
Cara Menggunakan DRP-DriverPack Solution
Setelah berhasil download DRP
ikuti langkah-langkah berikut, agar hasil Instalasi Driver lebih
maksimal dan meminimasi resiko kesalahan yang mungkin terjadi. Dalam
contoh dan saat eksperimen saya menggunakan Laptop-Netbook Toshiba Satellite L645 Core i3 dengan OS Windows 7 Ultimate dan Driverpack Solution 12.3 yang saya Burn/bakar dalam sebuah DVD :

- 1. Setelah DVD Driverpack Solution 12.3 dimasukkan > muncul autorun dan klik Run DriverPackSolution.exe , dan Driverpack Solution 12.3 akan Loading beberapa saat untuk mencoba menampilkan informasi tentang spesifikasi hardware software dan kondisi installasi driver perangkat komputer / Laptop kita :

- 2. Klik Menu-Tab Driver => klik "Install and Update". Kemudian akan tampil layar Confirm Installation, Klik "Install Driver" => klik "Start Installation".

- 3. Secara otomatis Driverpack Solution 12.3 akan menginstall driver-driver ke Sistem Operasi yang di ambil dari Database-nya di Folder ( dev_db dan drp ). Tunggu sebentar-beberapa menit sampai proses Installasi selesai.

Jika setelah proses ini tidak ada pesan/warning apapun dan sistem minta Restart serta saat masuk Desktop GUI Windows (juga di Device Manager tidak ada tanda seru-tanya), berarti proses installasi driver SELESAI! …

Jika ada pesan Error driver tidak bisa di install , ikuti langkah di posting selanjutnya ..
sumber : http://dotcomcell.com
DVD Driverpack 13 FINAL Maret 2013
DriverPack 13 adalah merupakan sebuah program yang berisi kumpulan-kumpulan driver untuk VGA, Chipset, SoundCard, LanCard, Wifi, Printer, dll. Bisa digunakan untuk semua versi windows dari windows XP, Vista, Seven (32/64 bit) dan Windows 8. yang dapat anda gunakan di berbagai macam komputer dan laptop. DriverPack 13 ini adalah versi terbaru Release Maret 2013.
UKURAN FILE : 4.5 Gb
Link Download Driverpack 13 :
http://drp.su/download.htm
CARA PENGGUNAAN DriverPack 13 :
Silahkan Klik Link Berikut : http://sendypramananta.blogspot.com/2013/04/solusi-dan-cara-cepat-install-driver.html
Cara kerja DriverPack 13 :
Ketika DVD DriverPack 13 dimasukkan dalam komputer ataupun laptop anda,
maka DriverPack 13 akan secara otomatis mendeteksi semua driver yang
dibutuhkan maupun yang perlu diupdate. Kemudian setelah proses
pendeteksian driver selesai, Anda hanya perlu sekali klik Install /
Update, maka DriverPack 2013 akan otomatis menginstal semua driver yang
anda butuhkan.
Apa saja Kelebihan dan Feature yang ditawarkan oleh 1 Keping DVD DriverPack 13 ?
- Dapat menemukan dan menginstall semua driver secara otomatis hanya dalam waktu sekitar 5 - 15 menit secara Offline.
- Menghemat waktu dan anda tidak perlu mencari driver lagi online di internet, karena semuanya sudah tersedia dalam 1 Keping DVD DriverPack 13
- Berisi semua hampir semua driver untuk semua jenis komputer dan laptop anda.
- Memiliki kemampuan untuk update driver yg sudah ada di komputer anda secara Offline
- Support Windows XP, VISTA, SEVEN, dan WINDOWS 8 baik 32bit / 64bit
- Mudah digunakan dan hanya perlu beberapa klik untuk install driver.
- DVD Driver Pack Solution 2013 berlisensi GNU GPL Freeware.
Terima Kasih...
Cara Cepat Install Windows 7 untuk Semua komputer dan Laptop 15 menit

Cara Cepat Install Windows 7 untuk Semua komputer dan Laptop 15 menit :
- Install windows 7 lengkap dengan aplikasi pendukungnya seperti office, winamp, antivirus, dll. Pada proses install ini jangan menggunakan partisi yang 100Mb. Jadi Install windows 7 tanpa partisi 100Mb yang biasanya digunakan untuk bootloader. Jadi windows seven terinstall hanya pada 1 partisi saja. Karena kita akan membuat image ghost dari partisi ini.
- Setelah Windows 7 beserta kelengkapannya jadi, Hapus User Account yang Aktif.
- Hapus User Account yang aktif, caranya Klik kanan Computer di start menu => Pilih Manage => Klik Local Users and Group => Users, kemudian delete user account yang aktif, Misal USER.


- Maka akan muncul wizard seperti diatas ini, klik YES saja, dan klik YES lagi kalau muncul wizard berikutya sampai User yang aktif benar-benar terhapus.
- Jalankan SYSPREP.EXE untuk menghapus semua registry hardware yang telah terpasang di system windows. Langkah ini adalah untuk menghapus segala registry hardware yang telah terinstal dengan maksud agar windows 7 ini bisa dipasang di semua Komputer ataupun Laptop.
- Caranya : Klik Start Menu, ketikkan di kolom SEARCH : " C:\windows\system32\sysprep\sysprep.exe " kemudian tekan ENTER.

- Maka akan terbuka program sysprep ( System Preparation Tools) seperti gambar berikut.

- Centang Generalize, kemudian di "shutdown option" pilih Shutdown.
- Klik OK, maka proses penghapusan registry hardware pada system windows akan dimulai.

- Tunggu kira-kira 5-10 menit, maka kemudian windows akan shutdown sendiri.
- Partisi Windows 7 sudah siap kita jadikan IMAGE GHOST , dan bisa dipasang di semua jenis komputer dan laptop. Jika anda hanya ingin ganti Mainboard dan tidak ingin Install Ulang dari awal lagi, maka dengan langkah diatas, harddisk yang isinya windows 7 lama, bisa langsung dipindahkan ke Mainboard yang baru tanpa Install Ulang.
Cara Membuka File / Folder yang Access Denied

Penyebab Folder / File yang Access Denied atau tidak bisa dibuka :
File
atau Folder tersebut dibuat pada file system NTFS yang mengalami
perubahan Security ID. Atau anda mungkin pernah memberikan password pada
Windows anda, kemudian anda melakukan install ulang Windows. Akibatnya
terjadilah Folder / File yang Access Denied yang tidak bisa dibuka.
Cara Membuka File / Folder yang Access Denied :
- Buka Windows Explorer => Klik Tools => Folder Options => View
- Hilangkan tanda centang pada Use simple file sharing (Recommended) => Klik OK

- Klik kanan pada folder yang terkunci : contoh nama folder "System Volume Information"]
- Pilih Properties => Security. ( Bila ada warning klik OK )
- Klik Advanced => Owner => akan muncul jendela berikut ini :


- Klik Nama User Administratornya, misal komputer saya namanya ekohasan.
- Beri tanda centang pada Replace Owner of Subcontainer and Objects.
- Kemudian Klik OK / YES
- Dan akhirnya Folder / File anda yang Access Denied akan bisa dibuka kembali.
Sumber :
http://ekohasan.blogspot.com
Kamis, 11 April 2013
KEYBOARD LED : Untuk pengguna laptop yang tidak dilengkapi indikator Caps Lock , Num Lock , Scroll Lock
Where is indicator for Caps Lock?
Many models of modern notebooks, netbooks and cordless keyboards have no indicators for Caps Lock, and Num Lock. Indicator of Scroll lock disappeared almost from any hardware. Keyboard LEDs software solves this problem and allows you to see the current state of keyboard locks on small icon in the system tray or on the floating window over your screen.
You can download and use Keyboard LEDs software absolutely free, either for personal or business purposes:
If you'll found this program interesting and helpful please inform all your friends about it

Caps Lock and Num Lock indicators right on your desktop
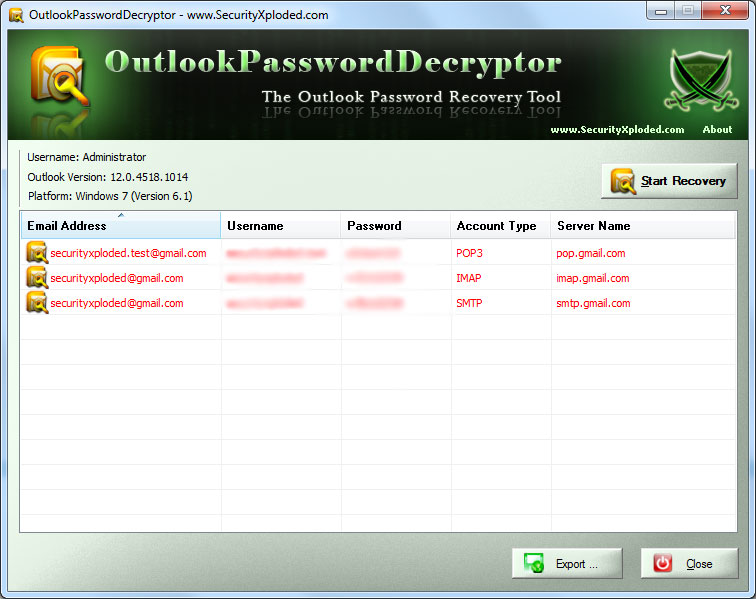
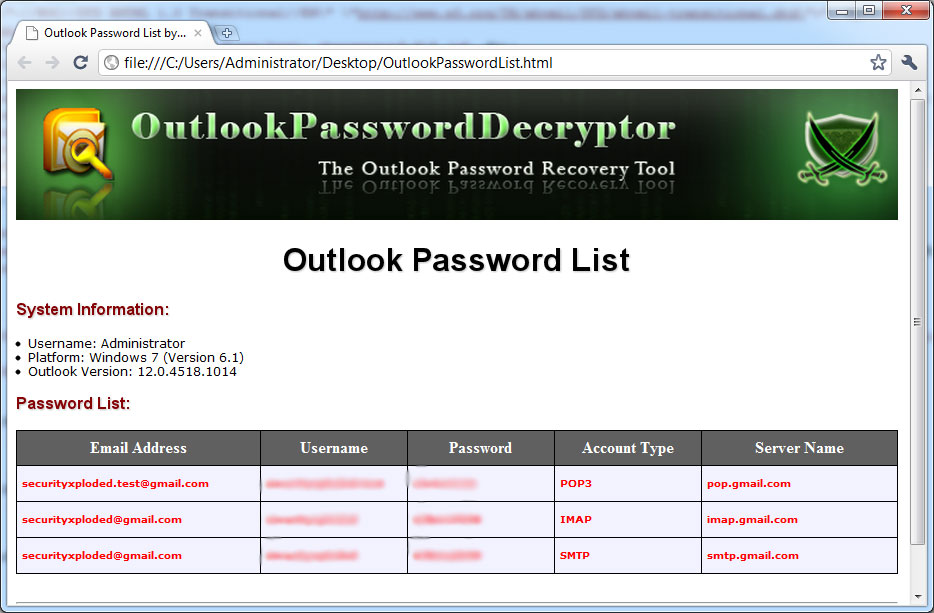
Jika lupa Password Microsoft Outlook : Outlook Password Decryptor
Untuk pengguna Microsoft Outlook yang lupa password account'nya, ada software utk menampilkan password MS Outlook : MS OUTLOOK Password Decryptor
| Outlook Account Password Location | |||||||||||||||
Different versions of Outlook uses
different location and mechanism to store the account password along
with other details such as email and server information.
Outlook Express, 98 and 2000 versions store the remembered password in the 'Windows Protected Storage' similar to older versions of Internet Explorer. The password link and other account information are stored at one of the below mentioned registry locations. |
|||||||||||||||
| HKEY_CURRENT_USER\Software\Microsoft\Internet
Account Manager\Accounts HKEY_CURRENT_USER\Software\Microsoft\Office\Outlook\OMI Account Manager\Accounts |
|||||||||||||||
| Outlook version starting from 2002 to 2010 stores the account password (other than Exchange Server) in encrypted format at following profile location | |||||||||||||||
| [Windows NT onwards] HKEY_CURRENT_USER\Software\Microsoft\Windows NT\CurrentVersion\Windows Messaging Subsystem\Profiles [Prior to Windows NT] HKEY_CURRENT_USER\Software\Microsoft\Windows Messaging Subsystem\Profiles |
|||||||||||||||
| Latest Outlook 2013 (version 15.0) stores the account configuration along with encrypted password at following location | |||||||||||||||
| HKEY_CURRENT_USER\Software\Microsoft\Office\15.0\Outlook\Profiles\Outlook | |||||||||||||||
| Newer versions of Outlook store the
'Exchange Server' based passwords in the credential provider (like network passwords) which is more secure than other methods. For more internal details on how OutlookPasswordDecryptor decrypts these passwords read the following research article, 'Exposing the Secret of Decrypting Outlook Passwords' |
|||||||||||||||
| Installation & Uninstallation | |||||||||||||||
| It comes with Installer so that you can install it locally on your system for regular usage. This installer has intuitive wizard which guides you through series of steps in completion of installation. | |||||||||||||||
| At any point of time, you can uninstall the product using the Uninstaller located at following location (by default) | |||||||||||||||
| [Windows 32 bit] C:\Program Files\SecurityXploded\OutlookPasswordDecryptor [Windows 64 bit] C:\Program Files (x86)\SecurityXploded\OutlookPasswordDecryptor |
|||||||||||||||
| |||||||||||||||
How to configure the size limit for both (.pst) and (.ost) files in Outlook 2010, Outlook 2007, and in Outlook 2003
Microsoft Outlook 2013, Microsoft Outlook
2010, Microsoft Office Outlook 2007, and Microsoft Office Outlook 2003
support American National Standards Institute (ANSI) and UNICODE
personal folders (.pst) and offline folder (.ost) files. This article
describes how to use the following four registry entries to limit the
size of both the .pst and the .ost files:
In the following table, the MaxLargeFileSize registry entry and the WarnLargeFileSize registry entry refer to a UNICODE formatted (new Large format) file, and the MaxFileSize registry entry and the WarnFileSize registry entry refer to an ANSI formatted (an earlier Microsoft Outlook format) file. The UNICODE values are set in megabyte (MB) increments, while the ANSI values are set in byte increments.
- The MaxFileSize registry entry
- The WarnFileSize registry entry
- The MaxLargeFileSize registry entry
- The WarnLargeFileSize registry entry
The MaxFileSize registry entry
The MaxFileSize registry entry determines the absolute maximum size that both the .pst and the .ost files can grow to. After this maximum size is reached, Outlook does not permit the size of the file to grow beyond this size.The WarnFileSize registry entry
The WarnFileSize registry entry determines the maximum data that both the .pst and the .ost files can have. After this maximum data is reached, neither the .pst nor the .ost files are permitted to add any more data. However, the size of the physical file may still increase because of internal processes.In the following table, the MaxLargeFileSize registry entry and the WarnLargeFileSize registry entry refer to a UNICODE formatted (new Large format) file, and the MaxFileSize registry entry and the WarnFileSize registry entry refer to an ANSI formatted (an earlier Microsoft Outlook format) file. The UNICODE values are set in megabyte (MB) increments, while the ANSI values are set in byte increments.
Outlook 2013 and Outlook 2010
| Name | Type | Valid Data Range | Default |
| MaxLargeFileSize | REG_DWORD | 0x00000001 – 0x0000C800 | 0x0000C800 51,200 (50 GB) |
| WarnLargeFileSize | REG_DWORD | 0x00000000 – 0x0000BE00 | 0x0000BE00 48,640 (47.5 GB) |
| MaxFileSize | REG_DWORD | 0x001F4400 – 0x7C004400 | 0x7BB04400 2,075,149,312 (1.933 GB) |
| WarnFileSize | REG_DWORD | 0x00042400 – 0x7C004400 | 0x74404400 1,950,368,768 (1.816 GB) |
Outlook 2007 and Outlook 2003
| Name | Type | Valid Data Range | Default |
| MaxLargeFileSize | REG_DWORD | 0x00000001 – 0x0000C800 | 0x00005000 20,480 (20 GB) |
| WarnLargeFileSize | REG_DWORD | 0x00000000 – 0x0000BE00 | 0x00004C00 19,456 (19 GB) |
| MaxFileSize | REG_DWORD | 0x001F4400 – 0x7C004400 | 0x7BB04400 2,075,149,312 (1.933 GB) |
| WarnFileSize | REG_DWORD | 0x00042400 – 0x7C004400 | 0x74404400 1,950,368,768 (1.816 GB) |
| Office Version | The policy location for the registry entries is located in the following path in Registry Editor | The user preference location for the registry entries is located in the following path in Registry Editor |
| Outlook 2013 | HKEY_CURRENT_USER\Software\Policies\Microsoft\Office\15.0\Outlook\PST | HKEY_CURRENT_USER\Software\Microsoft\Office\15.0\Outlook\PST |
| Outlook 2010 | HKEY_CURRENT_USER\Software\Policies\Microsoft\Office\14.0\Outlook\PST | HKEY_CURRENT_USER\Software\Microsoft\Office\14.0\Outlook\PST |
| Outlook 2007 | HKEY_CURRENT_USER\Software\Policies\Microsoft\Office\12.0\Outlook\PST | HKEY_CURRENT_USER\Software\Microsoft\Office\12.0\Outlook\PST |
| Outlook 2003 | HKEY_CURRENT_USER\Software\Policies\Microsoft\Office\11.0\Outlook\PST | HKEY_CURRENT_USER\Software\Microsoft\Office\11.0\Outlook\PST |

More information
Follow these steps to configure the size limit for both the .pst and the .ost files.Note The settings that are discussed in this article apply to both .ost and .pst files. If you modify these registry values, this can affect .ost files that are used with Cached Exchange Mode, with AutoArchive, and with .pst. files. If Outlook is configured to download shared folders, the contents of shared folders are stored in the local Offline Outlook Data (.ost) file. If the shared folders contain many items or large attachments, the size of the .ost file may grow significantly. Additionally, Outlook 2013 introduced support for Site Mailboxes. If an Outlook 2013 client is working in a Microsoft Exchange Server 2013/Microsoft SharePoint 2013 environment and is granted permission to a site mailbox, the site mailbox is automatically added to the Outlook 2013 profile. If Download Shared Folders is enabled, the site mailbox contents are synchronized to the local .ost file. This can result in the .ost file exceeding the set limit. For more information about the Download Shared Folders setting in Outlook, click the following article number to view the article in the Microsoft Knowledge Base:
982697 By default, shared mail folders are downloaded in Cached mode in Outlook 2010 and Outlook 2013
Important This section, method, or task contains steps that tell you how to modify the registry. However, serious problems might occur if you modify the registry incorrectly. Therefore, make sure that you follow these steps carefully. For added protection, back up the registry before you modify it. Then, you can restore the registry if a problem occurs. For more information about how to back up and restore the registry, click the following article number to view the article in the Microsoft Knowledge Base:
322756 How to back up and restore the registry in Windows
- Click Start, and then click Run.
- In the Open box, type regedit, and then click OK.
- In the left pane, expand My Computer, and then expand HKEY_CURRENT_USER.
- Expand Software, and then expand Policies.
- Expand Microsoft, and then expand Office.
- Expand 11.0 for Outlook 2003, 12.0 for Outlook 2007, or 14.0 for Outlook 2010, or 15.0 for Outlook 2013, and then expand Outlook.
- Click PST, and then right-click MaxFileSize in the right pane.
- Click Modify, and then type the value in the Value data box.
- Click OK.
- Right-click WarnFileSize, and repeat steps 8 through 9.
- Right-click MaxLargeFileSize, and repeat steps 8 through 9.
- Right-click WarnLargeFileSize, and repeat steps 8 through 9.
- Click Start, click Run, type Regedit, and then click OK.
- In the left pane, expand following registry key:
For Outlook 2013For Outlook 2010HKEY_CURRENT_USER\Software\Policies\Microsoft\Office\15.0\OutlookHKEY_CURRENT_USER\Software\Policies\Microsoft\Office\14.0\OutlookFor Outlook 2007For Outlook 2003HKEY_CURRENT_USER\Software\Policies\Microsoft\Office\12.0\OutlookHKEY_CURRENT_USER\Software\Policies\Microsoft\Office\11.0\Outlook - Right click Outlook, point to New, and then click Key.
- Type PST, and then press ENTER.
- Right click PST, point to New, and then click DWORD value.
- Type MaxFileSize, and then press ENTER twice.
- In the Edit DWORD Value window, choose Decimal and type the value in the Value data box, and then click OK.
Note 1GB=1*1024*1024*1024byte; 1MB=1*1024*1024byte; 1KB=1*1024byte, the example below is for 1GB. - Repeat steps 3 through 7 to create another DWORD WarnFileSize.
- Repeat steps 3 through 7 to create another DWORD MaxLargeFileSize.
- Repeat steps 3 through 7 to create another DWORD WarnLargeFileSize, and then close the registry.
Note For mass deployment of these registry keys on end-user machines, the ORK tool can be used.


It is recommended that the values between the MaxFileSize registry entry and the WarnFileSize registry entry, and the values between the MaxLargeFileSize registry entry and the WarnLargeFileSize registry entry be at least 5 percent (%) so that internal processes are not hindered from continuing.
If the value of the MaxFileSize registry entry ever exceeds the ANSI 2 gigabyte (GB) limit on either the .pst or the .ost files, the value will be ignored to limit the size to 2 GB to prevent corruption. The default value for the WarnFileSizeregistry registry entry is calculated to be 95% of the MaxFileSize registry entry for a UNICODE file, and it remains at 1,950,368,768 bytes for small ANSI files.
Note You can set the UNICODE limits beyond the values that are listed in the table. However, we do not recommend doing this because performance can decrease.
If .ost files or .pst files reach the limit that is specified in the WarnFileSize or the WarnLargeFileSize registries, the compaction function is triggered to try to reduce the size of the file to a usable level. When the WarnFileSize or the WarnLargeFileSize limit is reached, e-mail messages cannot be sent (provided that sent e-mail messages are stored in the Sent Items folder), and items cannot be copied or moved within the file. If the file is an archive .pst file that is used for AutoArchive, the AutoArchive operation will fail. However, e-mail messages can be deleted or archived from a .pst or from an .ost file that is currently being used as the default delivery location.
The following are some of the errors that may occur when files reach the maximums specified in the registries:
- When you try to move items to a .pst or an .ost file that has reach the limit, you receive the following error message:Can't move the items. The file
\ .pst has reached its maximum size. To reduce the amount of data in this file, select some items that you no longer need, and then permanently delete them. - When e-mail messages are delivered to a .pst or an .ost file that are using Cached Exchange Mode, and the file has reached the limit, the Mailbox Cleanup wizard launches.
Sumber : http://support.microsoft.com/kb/832925
TDK BISA BUKA FILE OFFICE 2007 DGN DOUBLE KLIK
- Open Explorer.
- Click Tools > Folder Options...
- Click the File Types tab.
- Scroll down to the file extension of the affected program (in this case, doc).
- Select the desired file extension and click the Advanced button. This will open the Edit File Type dialog box.
- Select the Open option, then click Edit...
- Find the line "Application used to perform action". Scroll to the end of the path (for example, my computer lists C:\Program Files\Microsoft Office\Office12\WINWORD.EXE" /n).
- Look for a switch labeled /dde at the end of the path.
- Delete /dde and type "%1" (including quotes) at the end of the path.
- Clear the "Use DDE" option.
- Click OK, then OK again.
- Double-click on the desired file. It should launch quickly.
Langganan:
Komentar (Atom)